LabVIEW on a Raspberry Pi and a LabVIEW NXG web dashboard

Wim Tormans
NI released the LabVIEW Community Edition on April 21st 2020. What does that mean? That means free LabVIEW for personal use and built-in support for Raspberry Pi. No more dreaming about LabVIEW on a Raspberry Pi… It is possible.
I played a little with the beta version and did an indoor monitoring project with LabVIEW on a few Raspberry Pi nodes and made a dashboard with a LabVIEW NXG WebVI.
In our old office, we had an old thermostat and broken temperature control valves. Some colleagues were always complaining that it was too cold at the office and others complained that it was too hot. I decided it was time to start measuring temperature in the different rooms.
My hardware setup:
- Raspberry Pi 3B: 38 EUR
- case: 7 EUR
- I2C sensor: 2 EUR
One node is less than 50 EUR.
In total, I made 3 nodes, one in my office, one upstairs and one in the meeting room.
My Software setup:
The beta version of the LabVIEW Community Edition and a beta version of LabVIEW NXG Community Edition. The LabVIEW NXG Community Edition includes the webmodule and an extended Systemlink Cloud evaluation period.
The plan:
The plan was pretty easy. The nodes should measure temperature and humidity with the I2C sensor. This data should be logged locally and should be made available with a web service. The dashboard connects to the web service of each node to visualize the data on a graph.
Node implementation:
For the Raspberry Pi nodes, I used the LabVIEW Community Edition.
I made a few classes and webservice which I use in the main VI
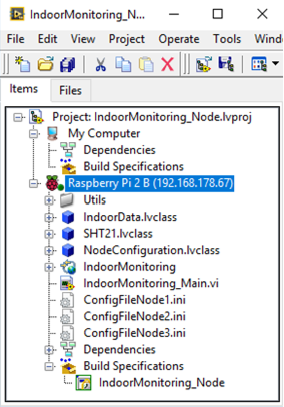
My project file is pretty straightforward:
- Indoordata.lvclass: the class which I use to buffer the data
- SHT21.lvclass: the class that acquires the data from the sensor with the LINX toolkit
- NodeConfiguration.lvclass: this class reads an ini file
- IndoorMonitoring webservice: the API to the outside world
- IndoorMonitoring_Main.vi
- IndoorMonitoring_Node: the build spec that is deployed to the nodes
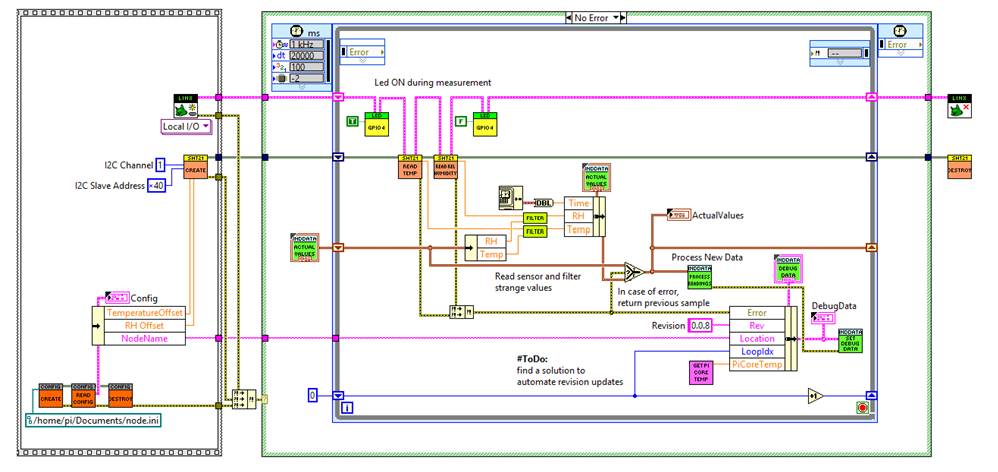
Above is a screenshot from my main VI.
In the first sequence, I do some initialization like reading a file, opening a reference to the LINX library, etc.
The magic happens in the timed loop. Every 20 seconds I do a measurement and store it in the IndoorData class together with some debug info.
If you look at the code a level deeper it still is easy to implement. For example, reading the temperature from the sensor is quite easy and shown in the image below.
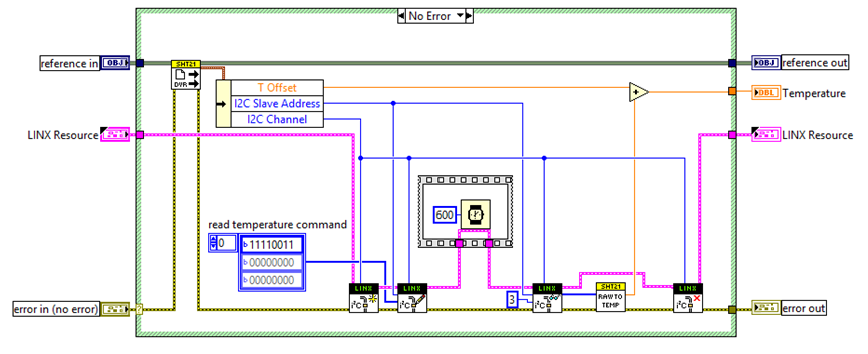
In this method, I use the LINX resource to:
- Open the I2C port
- Send a command to the sensor
- Receive the 3-byte reply
- Process the reply (as specified in the datasheet)
- Close the I2C port
The web service part also looks the same as it would be on other targets.

The above code shows the GetActualValues call to the web service. This gets the current values from the IndoorData class and returns it in JSON format to the caller.
Dashboard implementation:
The dashboard is implemented in LabVIEW NXG. I made a WebVI that accesses the web service of all sensor nodes to get current data and buffered data.
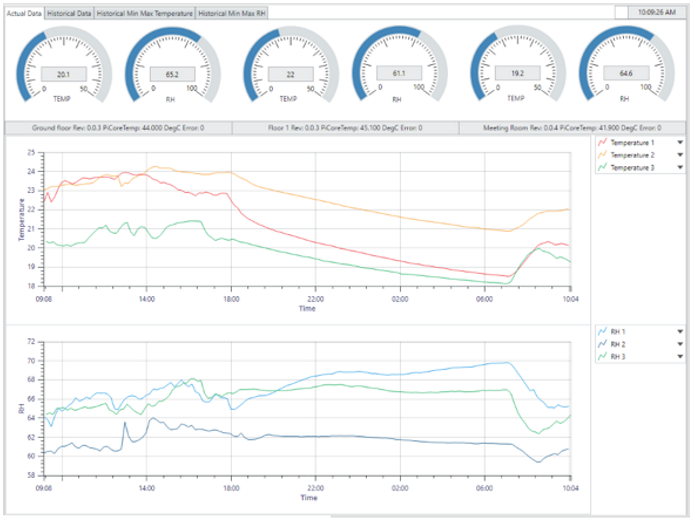
Classes were not supported in the web module when I made this so I made my own temporary implementation using wrapper VIs that simulate class-like behavior.
The screenshot shows the main vi and the code that is executed in the timeout.
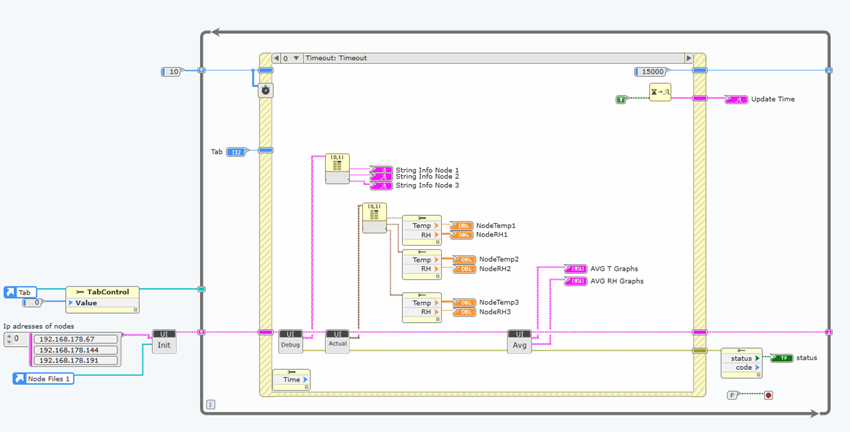
On the left side of the while loop, you see the init code with the IP addresses of the nodes.
In the while loop in the timeout, I connect to each node to get the current values, debug information and graph data.
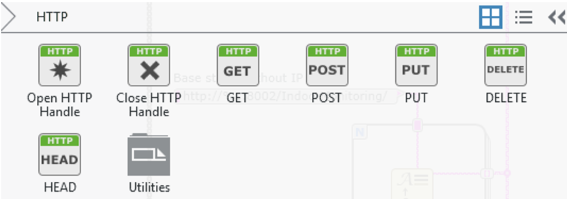
If we dive a little deeper into the code, you see that I use the HTTP palette to connect to the web service.
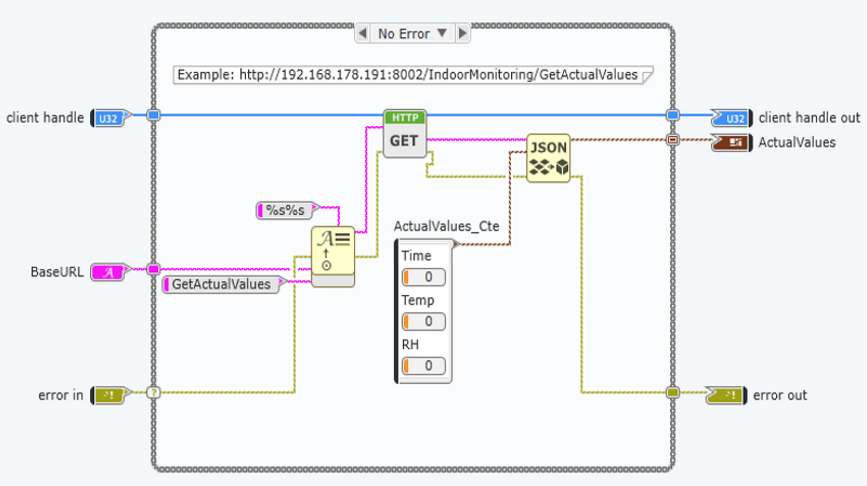
The screenshot below shows how easy it is to connect to the web service on a Raspberry Pi. I just format the URL and unflatten the JSON string to the correct cluster format.
This code is getting the current values on the WebVI side.
Once the webvi was ready, I hosted it on an Apache webserver on one of the Raspberry Pi's to start.
Afterwards I hosted it on a Systemlink Server. Even that is pretty straight forward.
Summary:
Free LabVIEW for personal use and the built-in support for Raspberry Pi are great!
Programming LabVIEW for a Raspberry Pi is just like programming for a standard NI product. NI did a really good job reviving the LINX toolkit. It is easy to use, easy to connect to the physical pins, etc. With just a few steps you are connected to your Raspberry Pi and programming it with LabVIEW.
Stop dreaming about this and start programming now!
Feel free to check out my GitHub repositories for more help getting started: https://github.com/wimtormans
Get your LabVIEW Community Edition here!
Wim Tormans

