Creating a Home Automation System with Zigbee and MQTT

Kitty van der Heyden
Imagine a world where your home knows your preferences before you enter, where your lights, devices and security system seamlessly communicate with each other to create a comfortable and secure environment. Imagine you could create such an environment in LabVIEW.
Assignment
During my third-year internship at VI Technologies, I was tasked with creating a home automation system using the Zigbee and MQTT protocols. This system allowed sensors to send data to a MQTT broker, which was then read and displayed in a LabVIEW user interface.
The initial assignment was to visualize if there are any windows open when the last person leaves the office. Another part of the assignment was to monitor the temperature in each office space. One of the requirements was to use the Zigbee protocol to read the sensors. The beauty of using Zigbee is that we can easily extend the system with sockets to monitor power consumption or with smart lights which can be turned off when accidentally left on when there is no one in the office. Another requirement was to use MQTT as the messaging protocol for LabVIEW to interface with.
Hardware
The requirements stated that we needed to monitor windows and temperature and use the Zigbee protocol. For the sensors we bought a few Aqara door and window sensors and a few Tuya temperature and humidity sensors. These sensors all needed to connect to a Zigbee router, and for that, we bought a generic standalone Zigbee router from TubesZB.
The Zigbee protocol is a low-power wireless communication standard that is commonly used for home automation systems. It allows devices to communicate with each other in a mesh network, which means that each device that is powered through the mains can act as a repeater to extend the range of the network.
Setup
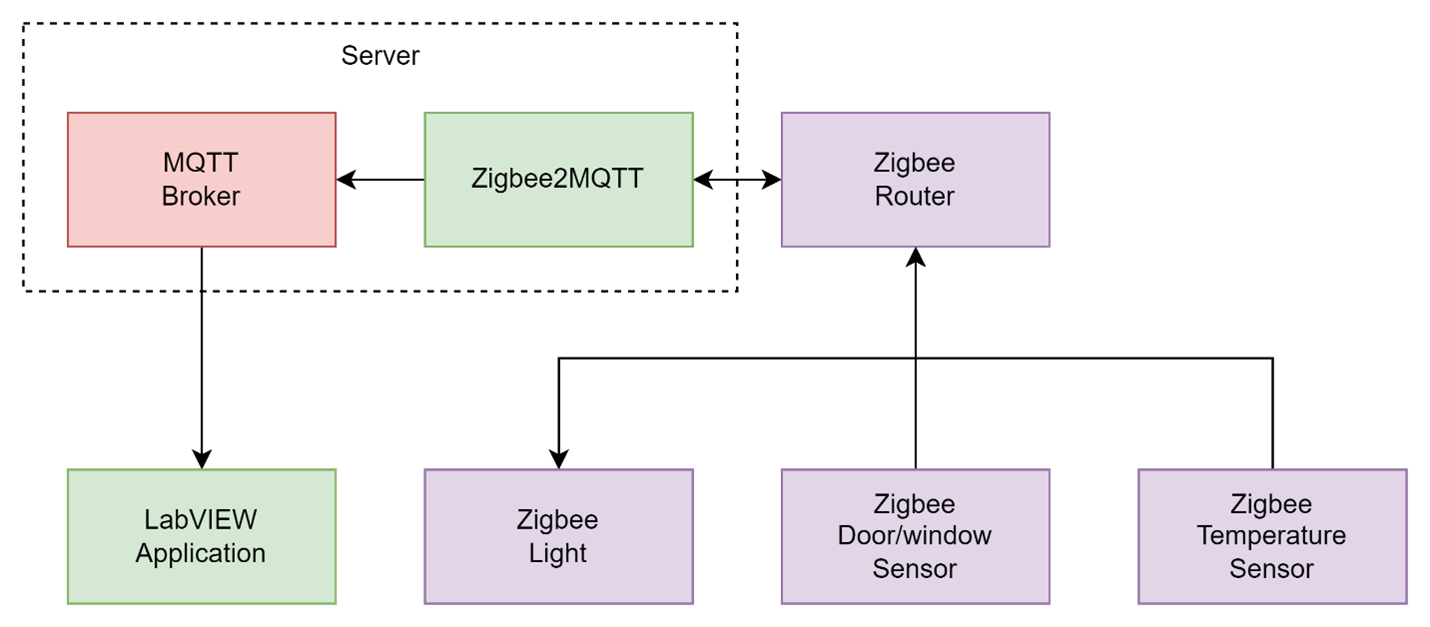
To connect with the Zigbee devices, we needed a solution that connected our devices with a more generic interface so LabVIEW and, in the future, other platforms could connect with the devices. Because of previous research for setting up this assignment it was already decided MQTT would be used as an interface. To connect Zigbee to MQTT we needed to set up a server which runs Zigbee2MQTT. This server acts as a bridge between the Zigbee network and the MQTT broker, converting the data from the Zigbee devices to MQTT messages that can be read by MQTT clients. A schematic overview of the system components is shown in figure 1.

Figure 1: Schematic overview of the components in the system
MQTT is a lightweight messaging protocol that is ideal for Internet of Things (IoT) applications. It uses a publish-subscribe model, where clients publish messages to a broker, and client subscribers can receive those messages from the broker.
LabVIEW application
Once the data was sent to the MQTT broker, we used LabVIEW to read and display it in a user interface. To read the MQTT messages, we used the MQTT Package from the LabVIEW Open Source Project. This package makes it very easy to read data from an MQTT broker by subscribing on specific topics as shown in figure 2. The data our application receives is in a JSON format, so the only thing we needed to do was convert each JSON string into the data of the specific device.

Figure 2: MQTT Example
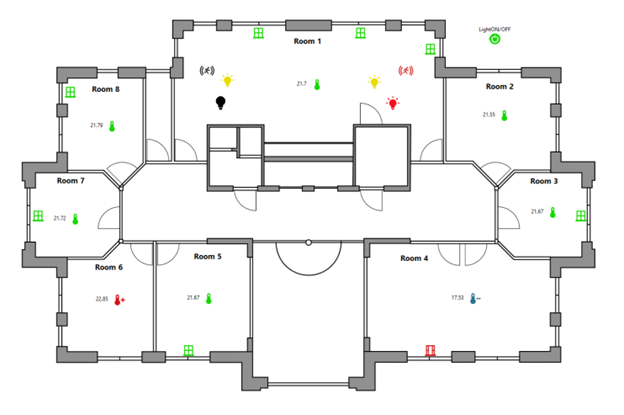
After parsing the data for each device in our system, we created a modern UI to show the status of our devices in a format that is easy to read. We created a LabVIEW UI that represents the floorplan of the building, with sensors placed at various locations throughout the building as shown in figure 3.

Figure 3: floorplan of the first floor of the office
The LabVIEW UI displays the data from the sensors in real-time, allowing users to monitor the environment of the building. For example, temperature sensors can display the current temperature in each room, while motion sensors can indicate when someone enters or exits a room.
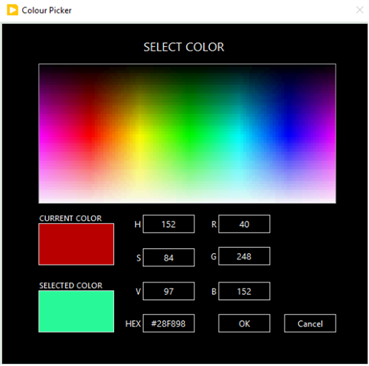
After creating the readout of the temperature and window sensors, the assignment was extended to add IKEA RGB Lights to the system. The UI needed to be updated to include a way to change the color of each light when pressing the lightbulb. For this, a custom color picker was created, which is shown in figure 4.

Figure 4: Custom color picker
Another addition to the software we made was the detection of movement. This was to monitor movement in a room and turn the lights off when there is no movement for a certain amount of time.
In the end, the project was a great opportunity to learn about home automation systems and the technologies that are used to connect sensors to LabVIEW. By using Zigbee and MQTT, we were able to create a system that is both reliable and efficient, allowing users to monitor their environment with ease.

